Great minds discuss ideas; average minds discuss events; small minds discuss people. Eleanor Roosevelt

Tuesday, March 18, 2014

Excitement

Yesterday I bounced off the ceiling with joy! 
You all know about this dress and some history. I know some of you are enjoying it as much as I am and I know some of you are as annoyed with the dress as I am. But I haven't let on my fears about the dress. 
I had one fear and that was about the front of the dress, in my opinion, the most important part. Well I finally faced my fear and ... it all worked out fabulously!
This weekend I spent hours finishing up that piping. 
I then decided to approach the undersleeves. What are undersleeves? Well they are the same as under garments and treated as such. 
Under garments were easier to wash than these big dresses. 

I rolled up my sleeves and I sat down at my sewing machine and I attacked a piece of linen till it looked just like the picture in my head. (I had just woke up from a power nap after dreaming of how the sleeves should look.) Needless to say, I was pretty proud of how they turned out. 
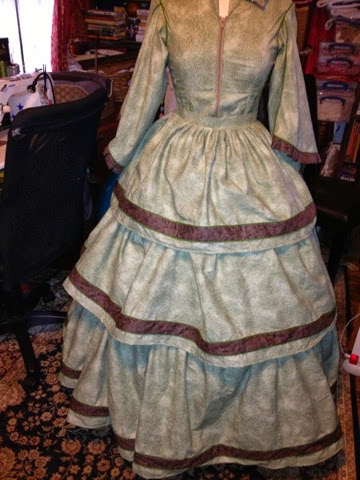
Remember the dress last week (just ignore my creative mess around the dress).
Now that I had tackled the sleeves, I HAD to do the front of the dress, darn!
There wasn't anything else to do to avoid it. 
You see, my Gold Nugget girl wanted a fancy lace up front. Her idea came from a blurry picture and I'd been trying to figure out how it worked since we started. I kept hoping she would change her mind. 
Besides the look she wanted, I had to figure out how it closed up the bodice.

It wasn't until we had a guest speaker at our guild last week who was a garment marker, (sorry I can't remember her name) that Pieces started to fall in place. It was then that I had a light bulb moment when the speaker said that it was better for garments with loop closures to loop together in opposite directions instead of all on one side. This would keep your garment from hanging lopsided. 
That light bulb popped! I now knew how the picture dress worked and how I was going to make my dress work. 

But I still was fearful. I was afraid of my loops looking unprofessional. And well, I'm not a professional. I just sew because I like it. But sometimes I just make up rules and pull ideas from a hat (I'm trying to use ladylike phrases here but that's not what I really said). 
I remembered that I had this funny tool from my Grandmother. 
I read the instructions several times before attempting to do those loops. In fact the house needed cleaning instead of making loops. 
Then after vacuuming, dusting, moping and lighting every smelly candle in the house ( I had to get rid of the boiled cabbage smell!) I sat back down and just did it.  
I made an empty sleeve from my piping strips. Easy so far. 
Then that tool said to tie it off, blah blah, then roll the tube over the end. Ok...
Not too bad. Every now and then I get hung up but it's working. 
I finally rolled the entire tube off the tool and gave it a bit of ironing. Ok, everything was still good.  
Then I made a piece of fabric for the front to cover that modern zipper! But I want that zipper to stay because it works so much better than the hooks and eyes. It just needs to be covered. This was going to be a faux loop closure. 
I cut my loop fabric into string bean lengths. They looked good enough to eat! 
I attached them. Everything is still going good. 
Added piping up both sides. Still good. 
Then I lined it up on the bodice front, very carefully!
Then I add some buttons and started to buzzing with happiness!
It worked! It really worked! 
All that fear, all the delay, all for not! (Or is it naught?)
Ignore the right side, it's not pinned straight but I was super excited and I had to take some pictures! And keep ignoring the background. 

So there it is, my Sergeant Pepper/Civil War dress. 
I faced my fears and my heart is still beating and I'm high on happiness. I'm pretty pleased with how it came out. No that doesn't mean the dress is done. I still have buttons and hooks and eyes to add, oh plus the lining. I don't not want to see or have anyone else to see my loose threads or seams. 
Ok I think I'm done ranting. Aren't you glad it's a happy rant inside of a grumpy rant?

Take care!
Brandie

Friday, March 14, 2014

32 Yards

I've been neglectful of my blog, so sorry! I promise I've been stitching but I'm sorry to say there hasn't been a stitch to any quilts. 
All my energy has gone into piping. 
The bodice has almost 8 yards of piping and I'm not even finished yet! I still have to cover that modern zipper. 
This is the first time I've used a zipper in a civil war dress and I feel like I'm cheating but we love the stability that it gives us. But it must be covered. 
For the last three days I've been putting the skirt together. Remember I said that most of these skirts use seven yards of fabric? And remember how we only started out with eight yards total?
After cutting out the bodice and the Pagoda sleeves (which use close to a yard each) I had a little over five yards left. 
I worried and pondered and then decided to cut the yardage lengthways giving me two lengths at 22 inches in width. 
I then added cheap muslin to "stretch" the skirt length. You can't see it, right?
Then I added over 24 yards of piping to her "accent" ribbon. Boy oh boy! 
I ran out of that piping three times. Every time I went to the shop to buy more, the owner laughed. But I think after a bit of ironing, it'll be perfect. I'm liking how our homemade ribbon coordinates with the box pleats on the sleeve.  
This is a heavy skirt! With all those layers and the tight fitted bodice, I don't envy the woman of yesteryear. Or the girl who will be wearing this dress! 

I promised to give a bit of history as to why our rural town does such an odd celebration. 
In April of 1851, a 54 pound gold nugget was found in our hills. At that time the nugget was worth $10,690. 
Today we relive that discovery by having a contest with local high school juniors who compete to be "Miss Gold Nugget Queen". 
The festivities start on Thursday evening with the crowning of the queen. 
On the weekend the whole town gathers on our main street to watch the parade. It's quite the event to us country folk, even if it closes off the main road for hours. 
All the girls who participate will also make tours of all the local grade schools and rest homes. This girls will be plume tuckered out by the time they remove their dresses on Sunday evening!
It's kind if a big deal in our neck of the woods, and I will try to keep you all posted so that you can giggle at the hicks-ville I live in. 

Take care and have a Wonderful weekend! Brandie

Tuesday, March 11, 2014

Hexie How To

Last week I posted a picture of these wonderful new tools. There were a few questions about them. 
I'm going to attempt to answer them. 

First question: Do they cut fabric?
No. These do not work on fabric. I tried and they didn't cut even a tiny bit. These are scrapbook tools and it seems them are strictly for paper. 
So if you aren't terribly upset I'll go on with a quick demo. 
If you like hexies and you are anything like me, you probably have several of these packages in a range of sizes. 
I never seem to have enough because I keep mine in till the last possible moment. I'm hoping with this new tool I'll never run out again!
Today we have it easy compared to the ladies back in the 30's and before. They would make one template, mark their fabric and sew them together without using them as a form. Or maybe this is just how the maker of these hexies did it. 
It's now my problem to get all the flowers together on a backing. 
Lets get back to today. 
Find a piece of card stock, not too heavy. I found that the card stock that comes in a package of nylons is perfect. This is what you see below.  
I stamped out both sizes for you to see. 

Now there are two ways to wrap a hexie with fabric. Sewing or glueing. I use to be a sewer but I'm trying to learn to glue. 
Both ways start the same. 
Grab a piece of fabric. Make sure you have at least a 1/4 inch on all sides. 
Cut the fabric around your hexie. It doesn't have to be pretty. You need to have enough fabric to fold over each side and enough to adhere to the next corner. 
Start by folding over an edge, holding it with your fingers fold over the next edge. If you use glue, add a drop. If you sew take two stitches on the corner. 
Pinch, glue/sew, hold. Repeat around each hexie corner. 
When you are done you may want to give the hexie a hint of pressing. 
You want a flat hexie. It makes them easier to whip stitch together. 
Just keep making them till you have seven. Of course there are many hexie quilts out there. Hexies can become addictive so good luck!

Take care, Brandie

Friday, March 7, 2014

Winding up the Spools

Have you made a little pile of spools and now you wonder what to do with them?
You could continue to make spools from all your scraps till you have a bed sized quilt. Or you can make a smallish wall hanging for your sewing room. 
That's what I've done with my 35 spool blocks. Kind of cute aren't they!
I tried to get it all quilt before this morning but I just didn't have time to do more than the stitching in the ditch of the "shelf". 
If you like what I did, I used a 1 x 4 sashing between each spool using the background fabric. 
My shelves are also 1 inch. Except the very bottom and sides with are 1 1/2 inch strips. 
The top was the leftover fat quarter folded in half and cut into a faux Chippendale molding.

If you've made any spools please share! We would all love to see them. 
I made a trip to the local Joann's yesterday and I was thrilled to find these hexies cutters there, THRILLED!
Even better, they were 40% off!
They had a bigger size but I thought that one was way too big. These were more my size. 
I just thought I'd pass the idea on and tempt you, if you can be tempt that is. 

Have a wonderful weekend!
Take care, Brandie

Wednesday, March 5, 2014

Poison Piping

For the last couple of weeks I've been piping away at the Gold Nugget dress. 
We started with a basic muslin prototype and have worked our way to the real deal, complete with poison green piping. 
Yards and yards of piping, 8 yards made, 6 yards already in the Pagoda sleeved top. 
The cats think its a new play thing so I've had to camouflage this glorious green piping. And why not use one of the pretty spools that decorate my sewing mantle? 
There is piping in the pleats. Piping in every seam, except the side seams that are hidden by the arms.  
Ignore the zipper! This will not be part of the dress. 
Piping in the sleeve top, bottom and seam. 
I've said it before and I'll say it again, I hate the dropped shoulders and working with them. They just aren't initiative to my way of thinking. But I got in the grove and figured out the solution. Lots of read on the web!

Some of these pictures don't quite have the color right. The main fabric is a soft moss green, accented with poison green piping and coco brown.
We could only find 8 yards of the focus fabric so I'm going to be making do with what's leftover to make (hopefully) a three tiered skirt. A three tiered skirt that would usually take over 7 yards to make. 
I'll be using a lot of muslin to stretch the fabric. 
And there will be a bunch more poison piping to add the those tiers. 

Hopefully I haven't bored you with this. I just thought some of you may be interested. And this seems to be the only sewing I've been getting done. 

Take care, Brandie

Sunday, March 2, 2014

Spool Tutorial

Time for spools of fun!
You can make as many or as few as you like. 
They can be scrappy or not. We are just having  fun with fabric. 

For each spool you will need:
(1) 2 1/2 x 2 1/2 for your middle (thread)
(If you want a scrappy striped look, cut 4 pieces at 3 x 1 1/8. Trim to 2 1/2 x 2 1/2)
(2) 1 1/2 x 1 1/2 background (sides of thread)
(2) 1 1/2 spool top and bottom
(4) 1 1/2 x 1 1/2 background 
Make a diagonal line across each 1 1/2 square. Line them up on the spool piece and sew from corner to corner. Making sure that you have them going in the same direction. 
Sew sides to the thread piece. 
Trim away the excess from spool pieces and press open. 
When you line up and sew the spool ends to the thread, feel for the seam and sew across both catching them right where they come together. 
I made a few mistakes and I thought I'd share how I fixed them. 
If you just happen to have a piece that didn't quite line up right, no worries. I just went back and sewed a bigger seam.

If the spool is over the sides, I thought it was just a spool that had some thread missing but you can fix those too. Make a smaller seam. 
When you are happy with your seams and have pressed you block, now you must trim it. 
Line your ruler up and trim it to 4 x 4. Your thread piece should line up perfectly at the 2 inch mark. Trim excess. 

Please let me know if I've missed something!
Have fun and show us what you make. 

Take care, Brandie